


We've all got a lot of time on our hands right now. So there's no excuse not to try something new!
We're coming up to what would be the beginning of the peak of 'hen party' season. You might have had to reschedule one or you're going to a virtual one. So why not create your own perfect bridal minnie ears? OR if you want to be awesome you could gift them to your bestie for her special day when we're no longer on lockdown!
These floral Minnie Ears are really easy and no sewing is needed!
What do you need?
- Silver Minnie Ears
- Flowers (for front only at least 2 packs)
- Glue
- 50mm Satin Ribbon (1 metre)
Optional Upgrade Extras
- crystals
- headband

These ivory flowers are very delicate but create a beautiful pair of ears. I used to make them for the Tutu Factory before I started Luby&Lola and they were a huge favourite.
The ones we have chosen are called 'Fairy Sheen' this means the diamante in the centre is an AB crystal that shines various colours under the light. You can also get them with an Aqua Blue or Rose Pink centre too.
I have linked the listing right at the start so you don't need to go looking for them on eBay.
As a base all you need are some cheap Minnie Mouse ears that you can find on eBay or Amazon. The silver sparkle is best as it's a better base.


So to start with we need to rip of that baby pink sequin bow and throw it away as far as you can. (You ugly.)
If you're really good at removing the bow, you can have the silver sparkle as the back of your ears if you wanted. Unfortunately, it can leave some glue showing. If that's the case we can just cover it with flowers. No one will ever know!
I'm just covering the front of the ears as an example and will have the silver as my front with a plain white back showing. If you wanted to cover both sides then order at least 4 packs, just so you have plenty.
What should I use to glue my ears?
Some people are a little scared of glue guns. I used to be too. I've made Minnie Ears without a glue gun for a long time before I moved onto using my glue gun at all opportunities.
You can get a really cheap glue gun with a few glue sticks just for this project and see how you get on with it. You might find you really like it and want to start making even more! But beware, you're probably going to burn yourself and it can hurt. I don't burn myself as much anymore but I've always got a least one burn mark on my hand!
I've also used Jewel Bond, Craft Glue, etc. If you wanted to go for the safer, but slower option just search for a strong glue.

The ears are usually quite close together so you can pull them off the headband and place them further apart. (If you're happy with where they are then you can leave them!)
They're really easy to remove and don't worry if you catch any silver strands, because we're going to cover it up anyway!
I'm upgrading the headband to a glittery white one for a super bridal feel. It's up to you if you'd like to swap to a nicer/thicker headband or just stick with the one you already have.

It's a good idea to work out how far apart you want your ears. You can always mark it so you know where to glue. Just make sure your ears will be covering the mark so it can't be seen. I usually do it by eye but when you make ears all day long....
Just glue along the bottom of the ears and stick onto your headband. The old glue is a good guide if you're unsure.
These are really soft and lightweight so you don't need to go crazy with the glue.

If you're using glue and not a glue gun, I'd recommend leaving it to dry before moving on to the next step!
This upgraded headband is 2.5cm wide and a white glitter. You can find some headbands to upgrade for around £2-£3, again on eBay.

Glued your ears on? Dry? Let's get to the fun parts!
All we want to do is glue the very centre of the flowers. Basically where the crystal is. You only need a little bit and you don't really want it to go any further out than the circle centre.

I start on the edge and work my way around. Try to overlap them a little so all the edge is covered. I tend to go as far over without covering the crystal.
So just outline the ear and then work your way in. We're going to be having another layer on top so don't worry if it isn't too neat or you don't manage to cover all the silver.

So once you've worked your way into the middle we're going to repeat the last step again and add another layer on top of it.

This is how it looks with two layers. Hopefully this gives you an idea of how much to overlap your flowers. But just go with whatever works for you!

Here you can see how much I overlap on the edges.
Now lets go and complete the 2nd ear.

And that's our flowers all done! Lots of coverage and no silver showing through.
Now, we need to make our beautiful no sew bow.
I chose a cream satin ribbon as it's a great match to go with the flowers. My current ivory satin ribbon is too close to a whiter shade. But you can choose any colour you like! Head over to eBay and you can buy soooo many shades in just a metre or two. Simply search '50mm double sided satin ribbon' there's a million sellers.
I usually go for 50mm satin ribbon, doubled sided if possible. I used just under 1 metre to make this bow but you might want to order a little extra, just in case anything goes wrong.

To start your No Sew Satin Bow we need two lengths of ribbon.
You might want to work out how big you want your bow to be compared to how far apart you placed your ears.
I cut my two pieces at 28cm each. Once you fold them in half that is how wide you bow will be.

I fold the bows in half and glue them together on one side (where the two sides meet) You can tie this instead of glueing, I used to tie each loop but it's just easier for me personally now to glue.

So now your two pieces are glued or tied together we want to scrunch them together so they look like the above photo. You can see your bow is starting to come together.

(I personally tie these two together before moving on to the next step. You may find that you'd rather skip to the next step, it might be easier for you.)
So now you want to tie your two scrunched pieces together. I have boxes of ribbon so I have some thinner ribbon but you could use some cotton, wool, string... whatever you may have lying around the house.
No one will see this tie so it doesn't matter too much what you use.

You can see your bow is really starting to come together now! So we need to add our bow to our ears.

So we need one more strip to make the middle of the bow. It doesn't need to be as long as you two bow pieces, just enough to tie around the headband.
So we're simply tying this piece of ribbon around the bow and headband.

So it will look like this at the back.

Next step is to pull those two pieces to the front of the ears, so they'll be behind the bow.
Trim your ends so they cannot be seen out from under your bow and we're going to use a little bit of glue to hold them here. Put some glue under and on top of your tie so it glues both your ends and the bow down.
Another way is to simply fold your middle strip in half and loop it around your bow and glue at the back of your headband/bow.
You can always have a play around and see what you find easier to do.
I find the first way just easier to make sure your bow looks pretty but the second option allows free bow movement. There's no right or wrong way, just experiment!

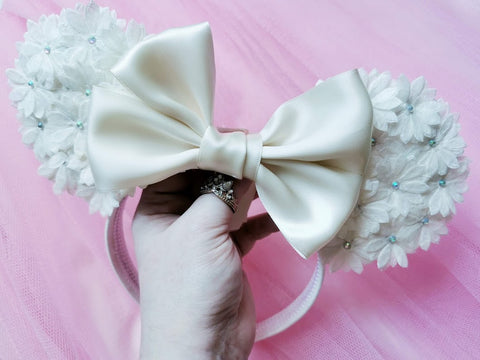
Aaaaaand that is your pair of ears done. Just how pretty do they look?!
Additional Option
Do you need more bling?
Why not add some crystals to the back of the ears? These are a great trim to finish off a plain back. You could even have a 'polka dot' effect on the whole of the ear instead of just along the bottom of the ears.
These are AB crystals and they are just magical. The ones shown are 10mm but you can get so many sizes (and colours!) If you want the same kind of crystals make sure you choose the colour 'AB crystal' just a normal 'crystal' shade isn't half as pretty.
Unfortunately, the smallest amount is 100 but you can just bling everything up with the left overs!


Once you've mastered this you can move onto different kinds of flowers!
Let us know if you have a go, we'd love to see them!
6 comments
koGLtTShDz
DazuBmiIEdhXSnLP